


KubeSphere project gateways and Routes provide a method for aggregating Services, which allows you to expose multiple Services by using a single IP address in HTTP or HTTPS mode. You can configure routing rules by using a domain name and multiple paths in a Route. The routing rules map different paths to different Services. You can also configure options such as HTTPS offloading in a Route. Project gateways forward external requests to Services according to routing rules configured in Routes.
Overall Architecture
Project gateways are used to aggregate Services. Therefore, we can understand the project gateway architecture from the perspective of Services. The following figure shows the architecture of a project gateway in a typical production environment.
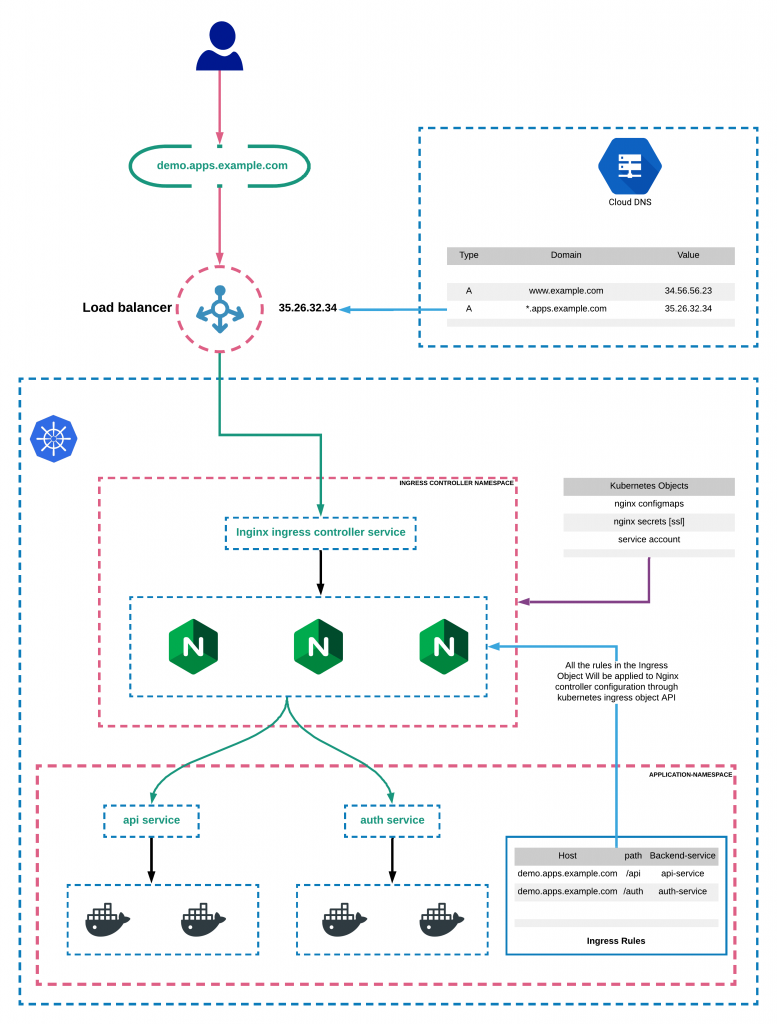
The architecture contains four parts:
- Nginx Ingress Controller, which is the core component of the project gateway architecture. Nginx Ingress Controller functions as a reverse proxy and obtains reverse proxy rules (routing rules) from Routes. A Route in KubeSphere is the same as an Ingress in Kubernetes. A project gateway is in effect an Nginx reverse proxy exposed by using a Service. In a production environment, the Service is usually a LoadBalancer Service, which uses a public IP address and an external load balancer provided by a cloud vendor to ensure high availability.
- External load balancer, which is generated according to the Service settings and is usually provided by a cloud vendor. Features such as SLA, bandwidth, and IP configuration of different load balancers may vary. You can usually use annotations to configure the load balancer. Different cloud vendors may support different annotations.
- Domain name resolution service, which is usually provided by a DNS provider. You can configure DNS records to map a domain name to the public IP address of the load balancer. If the IP address is also used by subdomain names, you can also use wildcard characters to map multiple subdomain names to the same IP address.
- Services and Routes. You need to create Services to expose applications, and create Routes to aggregate multiple Services. Note that Nginx Ingress Controller does not use kube-proxy to forward traffic to Services. It obtains Endpoints corresponding to Pods from Services and set them as upstream targets of Nginx. Therefore, Nginx is directly connected to Pods, which avoids extra network overheads caused by Services.
Compare Routes with LoadBalancer Services
In practice, people might be confused about the application scenarios of Routes and Services. Both of them are used to expose applications to outside the Kubernetes cluster and provide load balancing. In addition, Routes seem to depend on Services. So what are their differences? We can discuss this issue from the following perspectives:
- Services are originally designed to abstract application back-ends (Pods) for access over the network. All back-ends of an application are the same and are exposed using the same Service. By contrast, Routes are designed to manage API objects. Although a Route can also be used to expose a single Service, its more powerful feature is that it can aggregate multiple Services and provide a unified IP address and domain name for external access.
- Services work at layer 4 of the OSI model and use combinations of IP addresses, ports, and protocols as unique identifiers. Therefore, IP addresses of different Services on the same network cannot be the same. For example, HTTP/HTTPS-based Services typically use ports 80 and 443. When using these Services to expose applications, you need to assign different IP addresses to different Services to avoid port conflicts, which is a waste of resources. Routes work at layer 7 of the OSI model, and all Services exposed by using Routes can share the IP address and ports 80 and 443 of the same project gateway. Each Route uses a domain name and multiple paths as unique identifiers of different Services. The project gateway forwards HTTP requests to different Services based on the domain name and paths configured in Routes.
- Services support both TCP and UDP and do not restrict upper-layer protocols, while Routes support only HTTP, HTTPS and HTTP2 and cannot forward TCP-based or UDP-based requests.
From the preceding analysis, we can draw a conclusion that Routes are ideal for HTTP-based microservice architectures while Services support more protocols, though Services are not the best choice for HTTP-based applications.
Compare Routes with Spring Cloud Gateway and Ocelot
Java and .NET Core developers must be familiar with Spring Cloud Gateway and Ocelot, which are most frequently used API gateways in Java and .NET Core respectively. So can we use these gateways directly instead of Routes and Services? To discuss this issue, we need to first have a basic understanding of API gateways:
An API gateway is the sole entrance for clients to access back-end services. It functions as a reverse proxy for aggregating back-end services, routes client requests to back-end services, and returns service responses to clients. An API gateway also provides advanced features such as authentication, monitoring, load balancing, and HTTPS offloading.
Therefore, Routes and API gateways such as Spring Cloud Gateway and Ocelot provide similar functions. For example, you can use a Service to expose Spring Cloud Gateway to outside the cluster to achieve certain features of a Route. The following briefly analyzes their pros and cons:
- As application gateways, all of them can be used to forward traffic. In addition, all of them support routing rules based on domain names and paths.
- In terms of service registration and discovery, all-in-one solutions such as Spring Cloud Gateway provide rich features and are more friendly to Java developers. Services can be seamlessly integrated by using a registration center. Ocelot does not provide a built-in service discovery and registration scheme, but you can achieve this feature by using both Ocelot and Consul. Applications deployed in a Kubernetes cluster typically use DNS-based service discovery, but no unified service registration and discovery scheme is available for clients. You need to explicitly define routing rules in a Route to expose Services. By contrast, Spring Cloud Gateway fits well into the technology stack of the development language, which makes learning much easier for developers.
- In terms of universality, Routes (Ingresses) are the cloud-native API management standard defined by the Kubernetes community. KubeSphere uses Nginx Ingress Controller to implement the functionality of Routes by default. Meanwhile, KubeSphere is also compatible with other Ingress controllers. Routes provides only common features, while project gateways provide more operations and maintenance (O&M) tools such as logging, monitoring, and security. By contrast, API gateways are tightly coupled with programming languages and development platforms. Usually API gateways cannot be used across different languages without the introduction of more technology stacks or client support. API gateways usually provide relatively stable features and support rich interfaces for plugins, allowing developers to extend the features by using languages they are familiar with.
- In terms of performance, Routes based on Nginx Ingress Controller evidently outperform Spring Cloud Gateway and Ocelot.
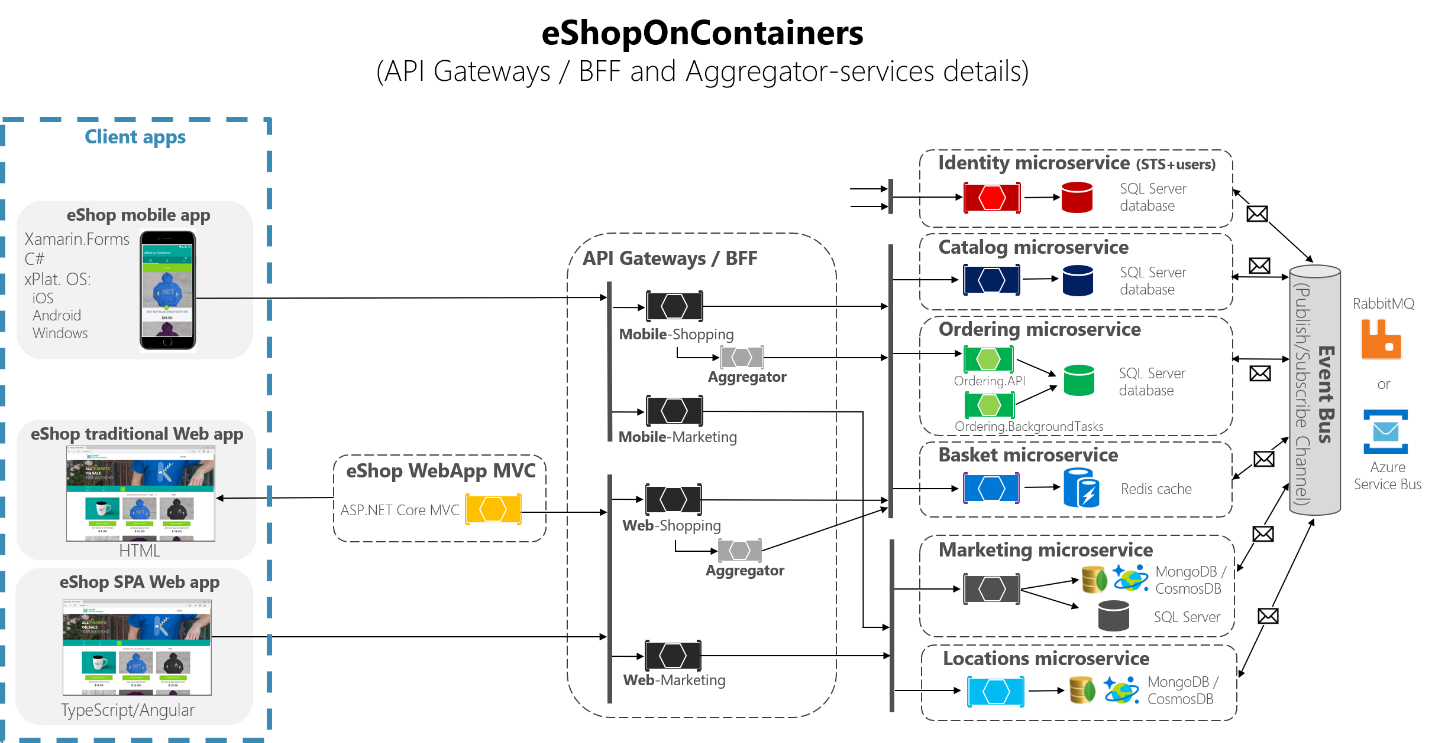
Overall, each type of gateway has its own advantages and disadvantages. In the initial phase of a project, the gateway architecture should be considered. In cloud-native scenarios, Routes are an ideal choice. If your team depends on a specific technology stack, the API gateway of the technology stack is preferred. However, this does not necessarily mean you can only use one type of gateway. In some complex scenarios, you can use different types of gateways to utilize their advantages. For example, developers can use API gateways that they are familiar with to implement features such as service aggregation and authentication, and use Routes to expose these API gateways to implement features such as logging, monitoring, load balancing, and HTTPS offloading. For example, Microsoft's microservice architecture demo eShopOnContainers uses this hybrid architecture.
Hands-on Practice
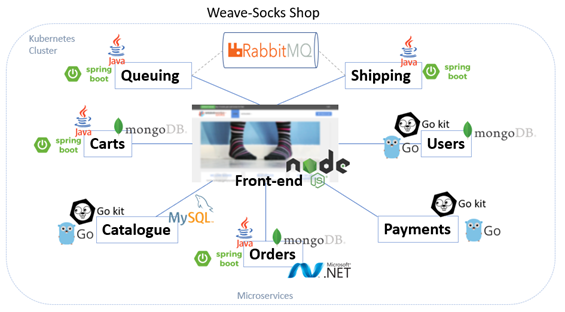
So far we have discussed the application scenarios and overall architecture of Routes. In the following we will demonstrate how to configure a project gateway and Route in KubeSphere. The following uses SockShop as an example, which is a microservice demo project of Weaveworks. SockShop uses an architecture where the front-end and back-end are separated. It consists of the front-end Service and back-end Services such as catalogue, carts, and orders. In the architecture, the front-end Service not only provides static pages, but also functions as a proxy that forwards traffic to back-end APIs. Assume that asynchronous service blocking occurs when Node.js forwards traffic to APIs, which deteriorates page performance. To address this problem, we can use Routes to directly forward traffic to the catalogue Service. The following describes the configuration procedure.
Preparations
Before deploying SockShop, you need to create a workspace and a project (for example,
workspace-demoandsock-shop). For details, please refer to Create Workspaces, Projects, Users, and Roles.After the
sock-shopproject is created, you need to use kubectl to deploy Services related to SockShop. You can use your local CLI console or kubectl provided by the KubeSphere toolbox to run the following command.kubectl -n sock-shop apply -f https://github.com/microservices-demo/microservices-demo/raw/master/deploy/kubernetes/complete-demo.yaml
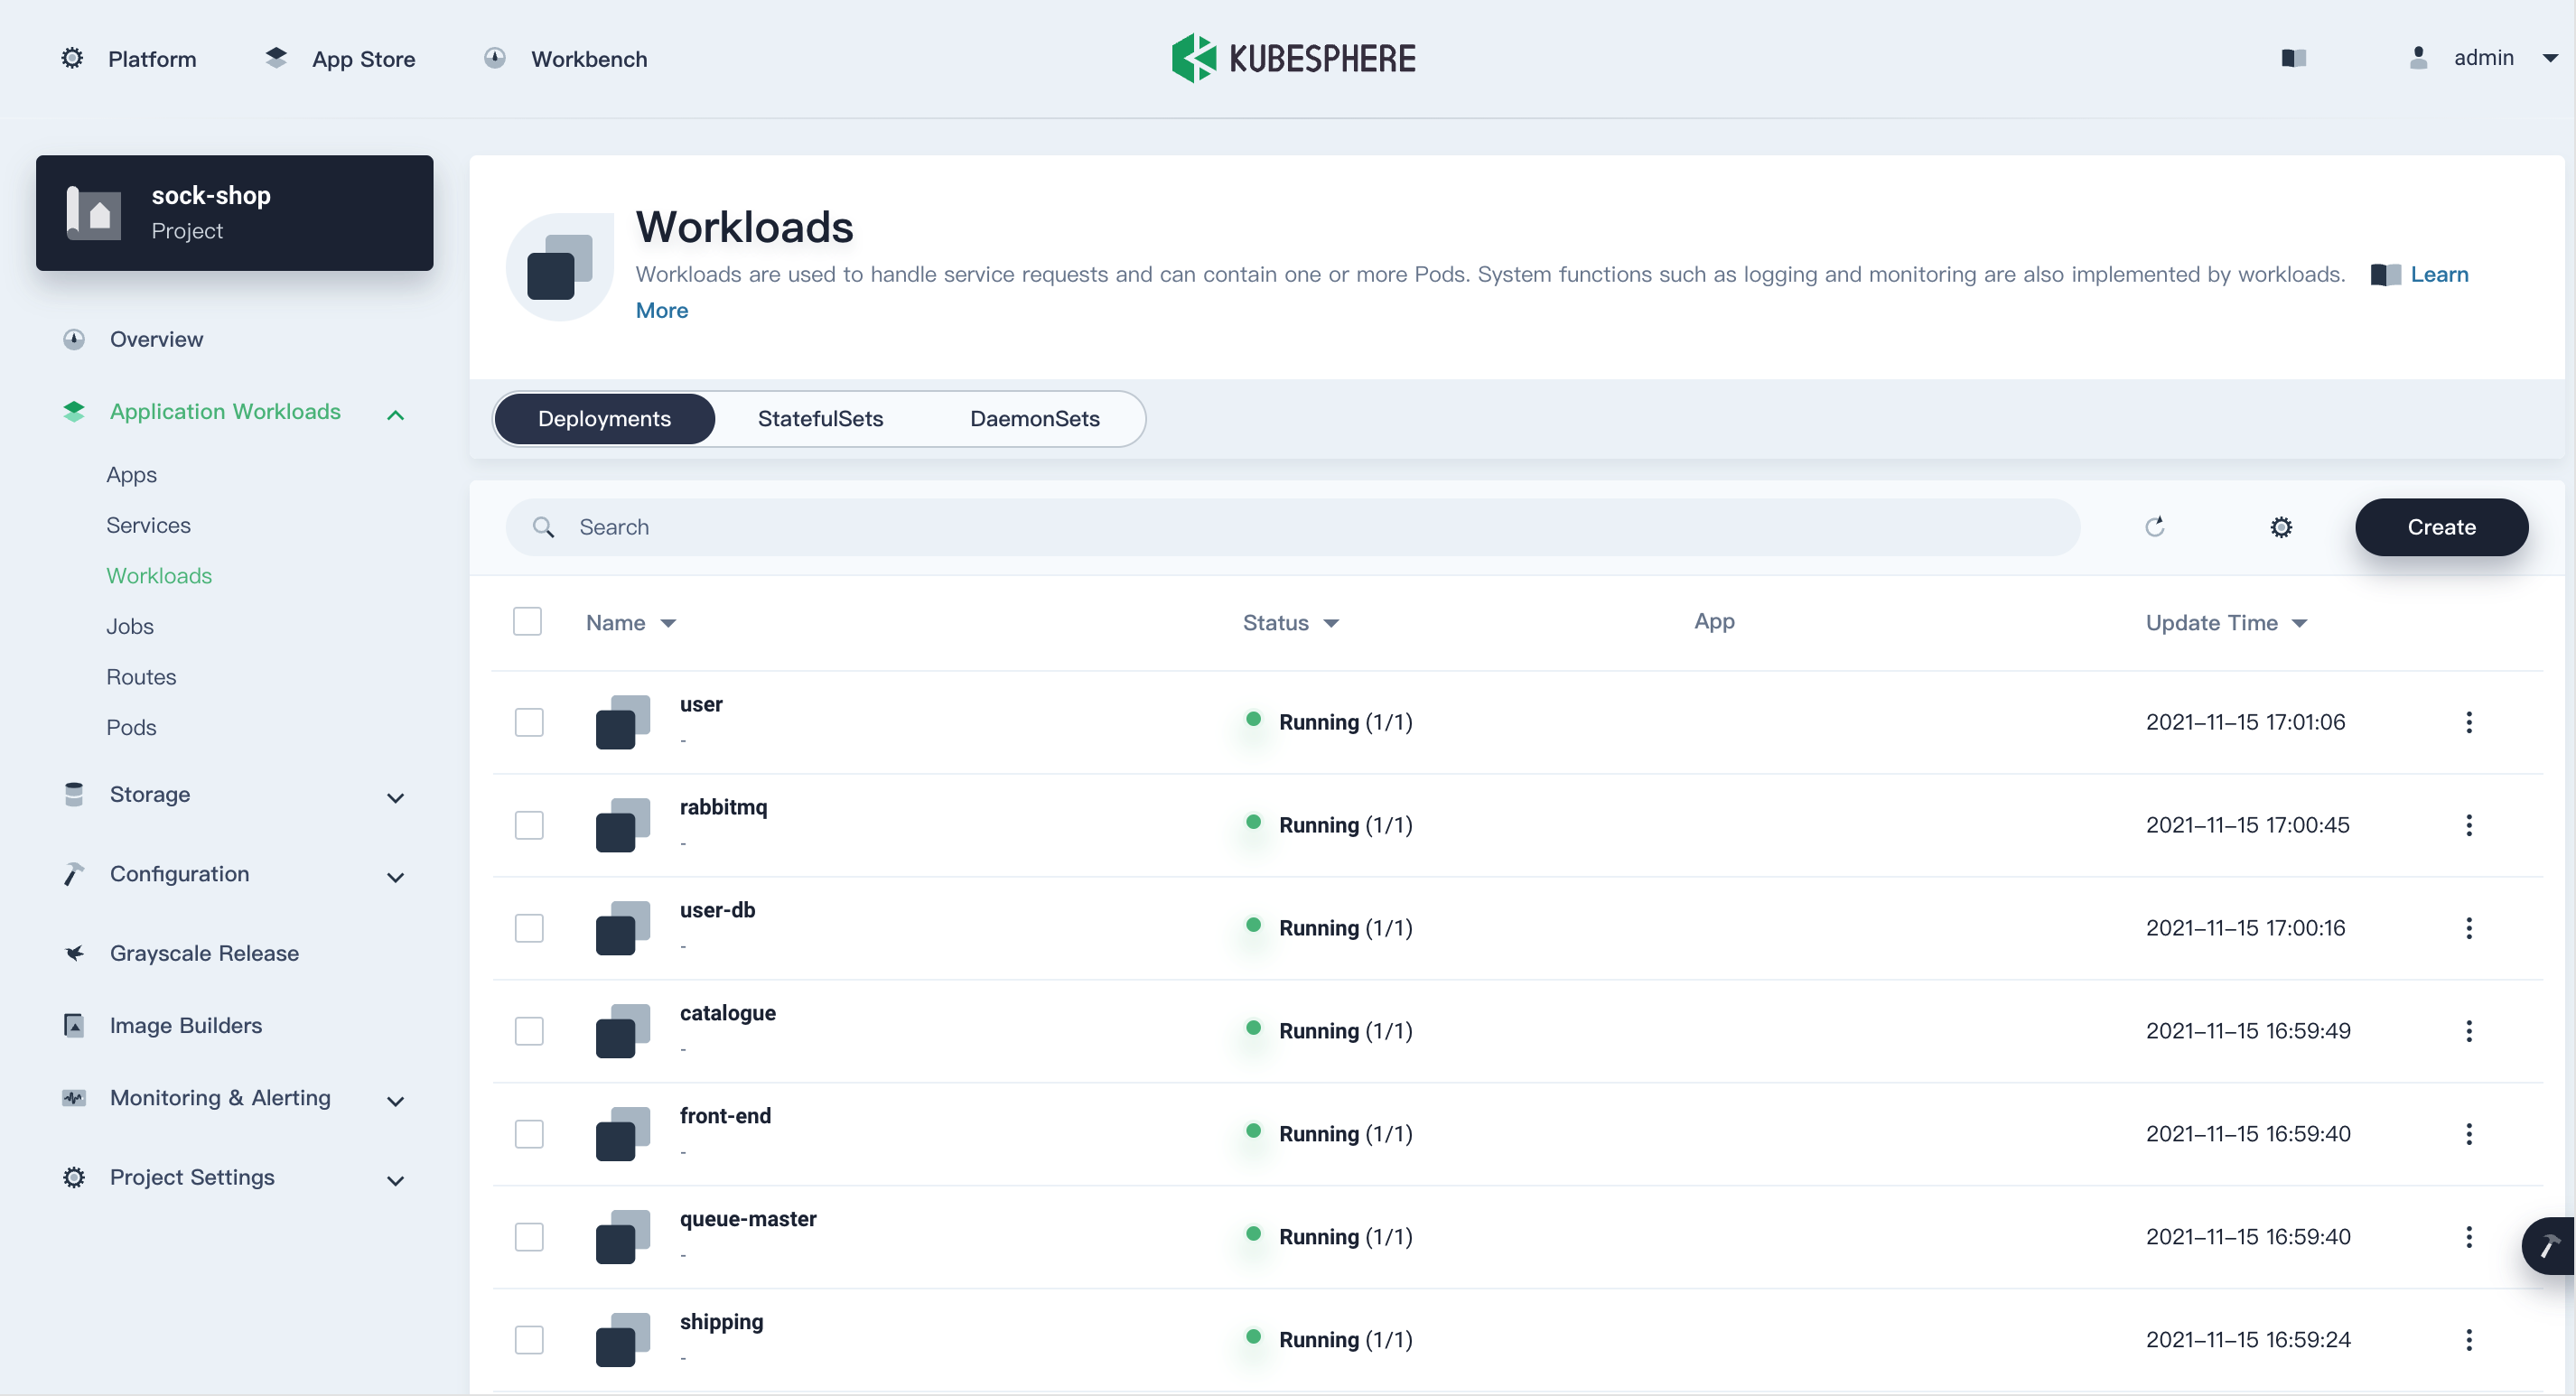
After the preceding preparations are complete, go to the Workloads page of the sock-shop project to check the workload status, and wait until all Deployments are running properly before proceeding to the next step.
Enable the Project Gateway
Go to the
sock-shopproject, select Project Settings > Advanced Settings on the left navigation pane, and click Enable Gateway.In the displayed dialog box, set parameters based on the KubeSphere installation environment. If you are using a local development environment or a private environment, you can set the gateway access mode to
NodePort. If you are using a managed Kubernetes environment, you can set the gateway access mode toLoadBalancerfor high availability.
Create a Route
In the left navigation pane, select Application Workloads > Routes, and click Create on the right. On the Basic Information tab, set Name to
front-end. On the Routing Rules tab, add a routing rule. This example uses the Auto Generate mode. The system will automatically generate a domain name in the<Service name>.<Project name>.<Gateway IP address>.nip.ioformat, and the domain name will be resolved by nip.io into the gateway IP address. Set the path, Service, and port to/,front-end, and80respectively. Click Next, and then click Create.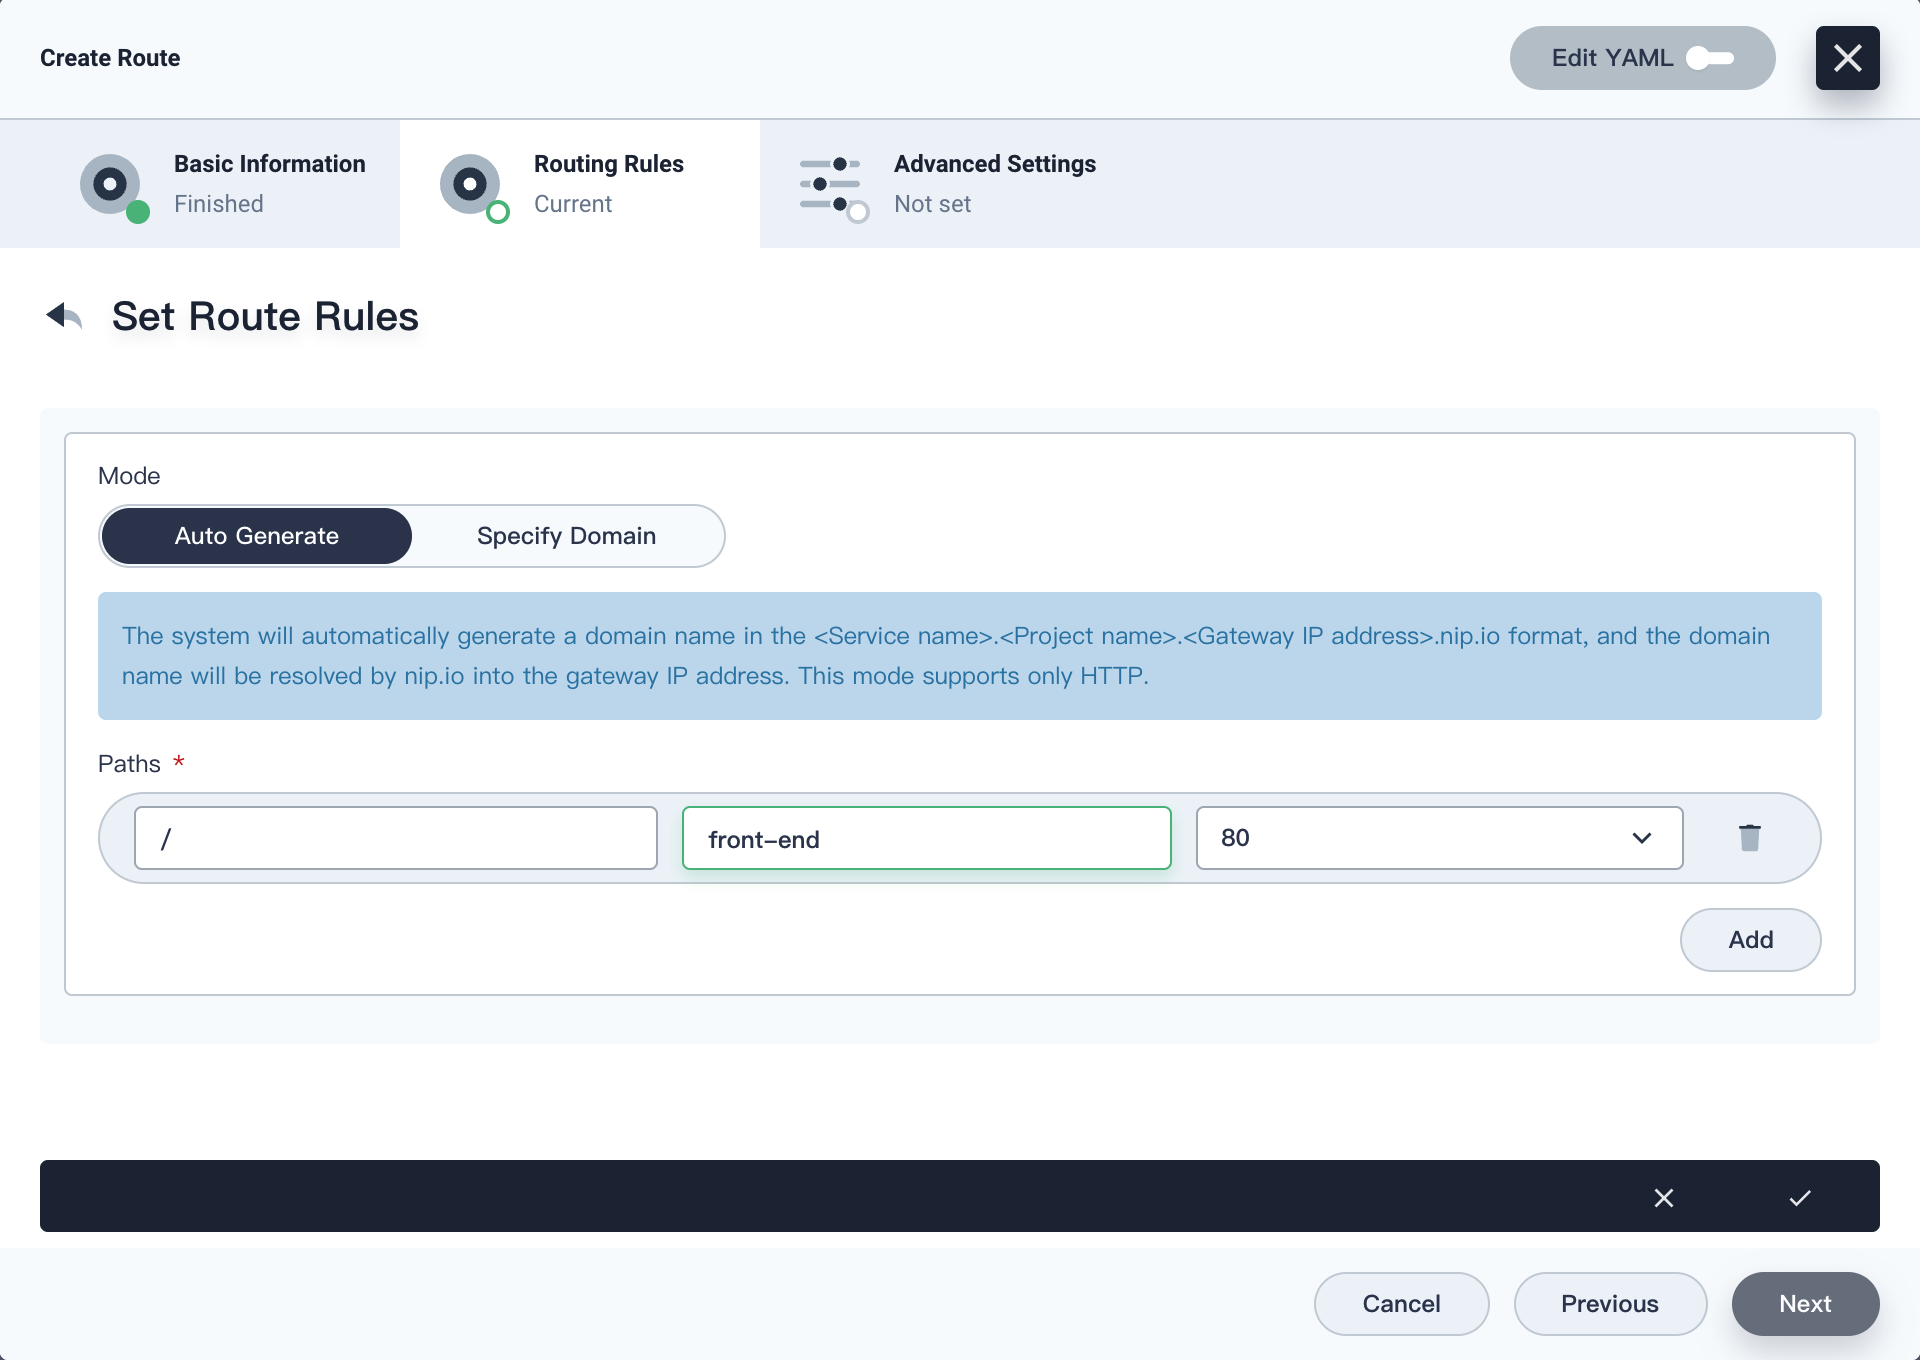
After the Route is created, click
front-endin the Route list to view its details. On the Resource Status tab, click Access Service. If the Route functions properly, the following web page will be displayed.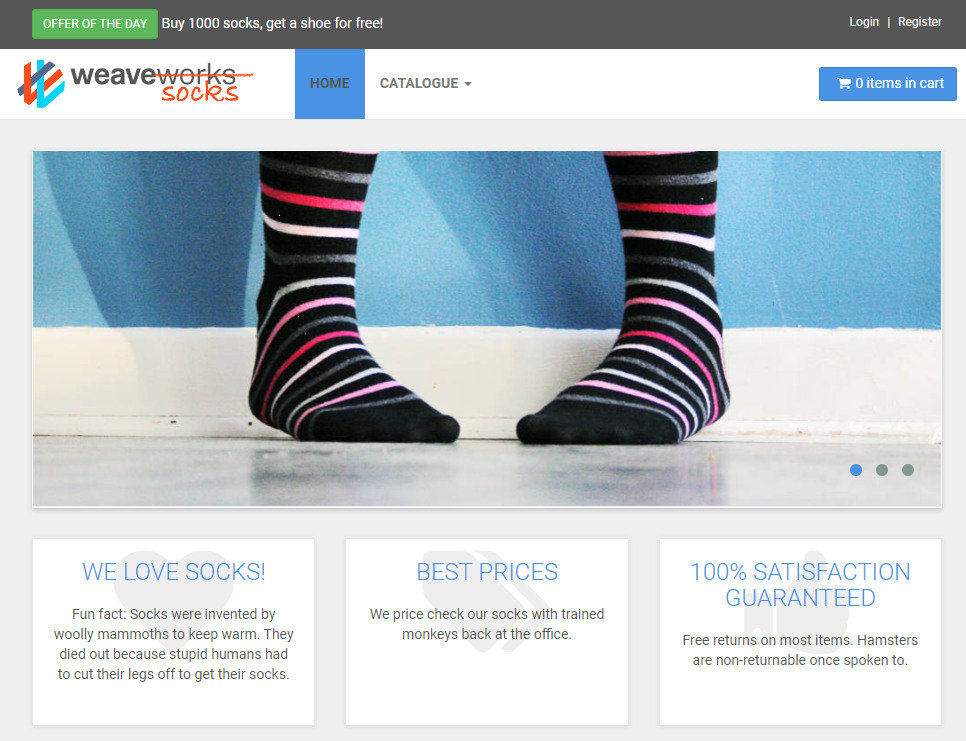
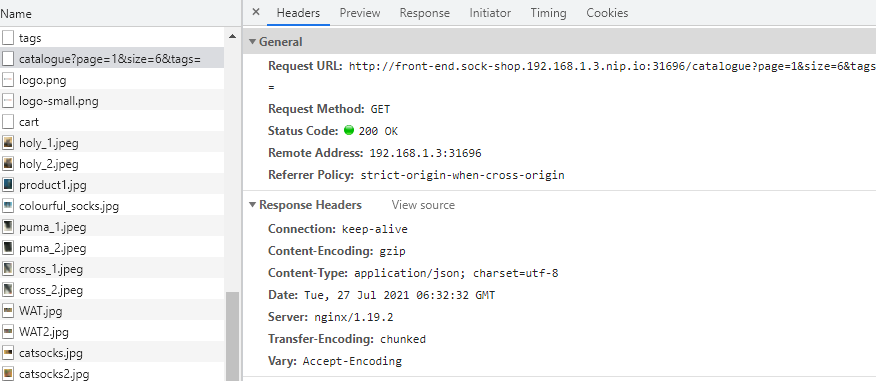
Open the debugging console of your web browser (for example, press F12 for Chrome) to check the network requests of the SockShop web page. The following figure shows an API request sent to
catalogue.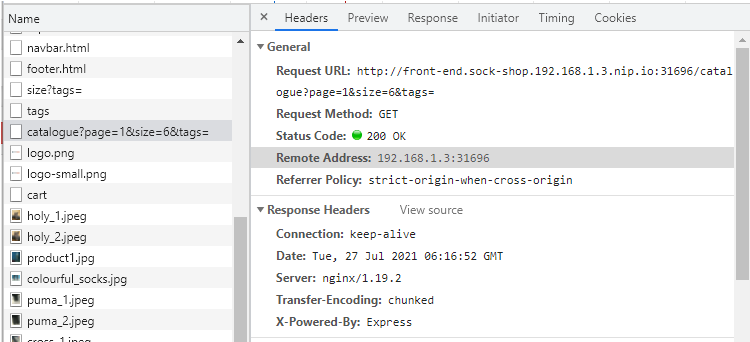
X-Powered-By: ExpressinResponse Headersshows that the request is forwarded by thefront-endNode.js application.On the details page of
front-end, select More > Edit Routing Rules. In the displayed Edit Routing Rules dialog box, select the routing rule created in step 1, and click the edit icon on the right. Click Add to add a new path, and set the path, Service, and port to/catalogue,catalogue, and80respectively. Click Save to save the settings. The following figure shows the edited rule.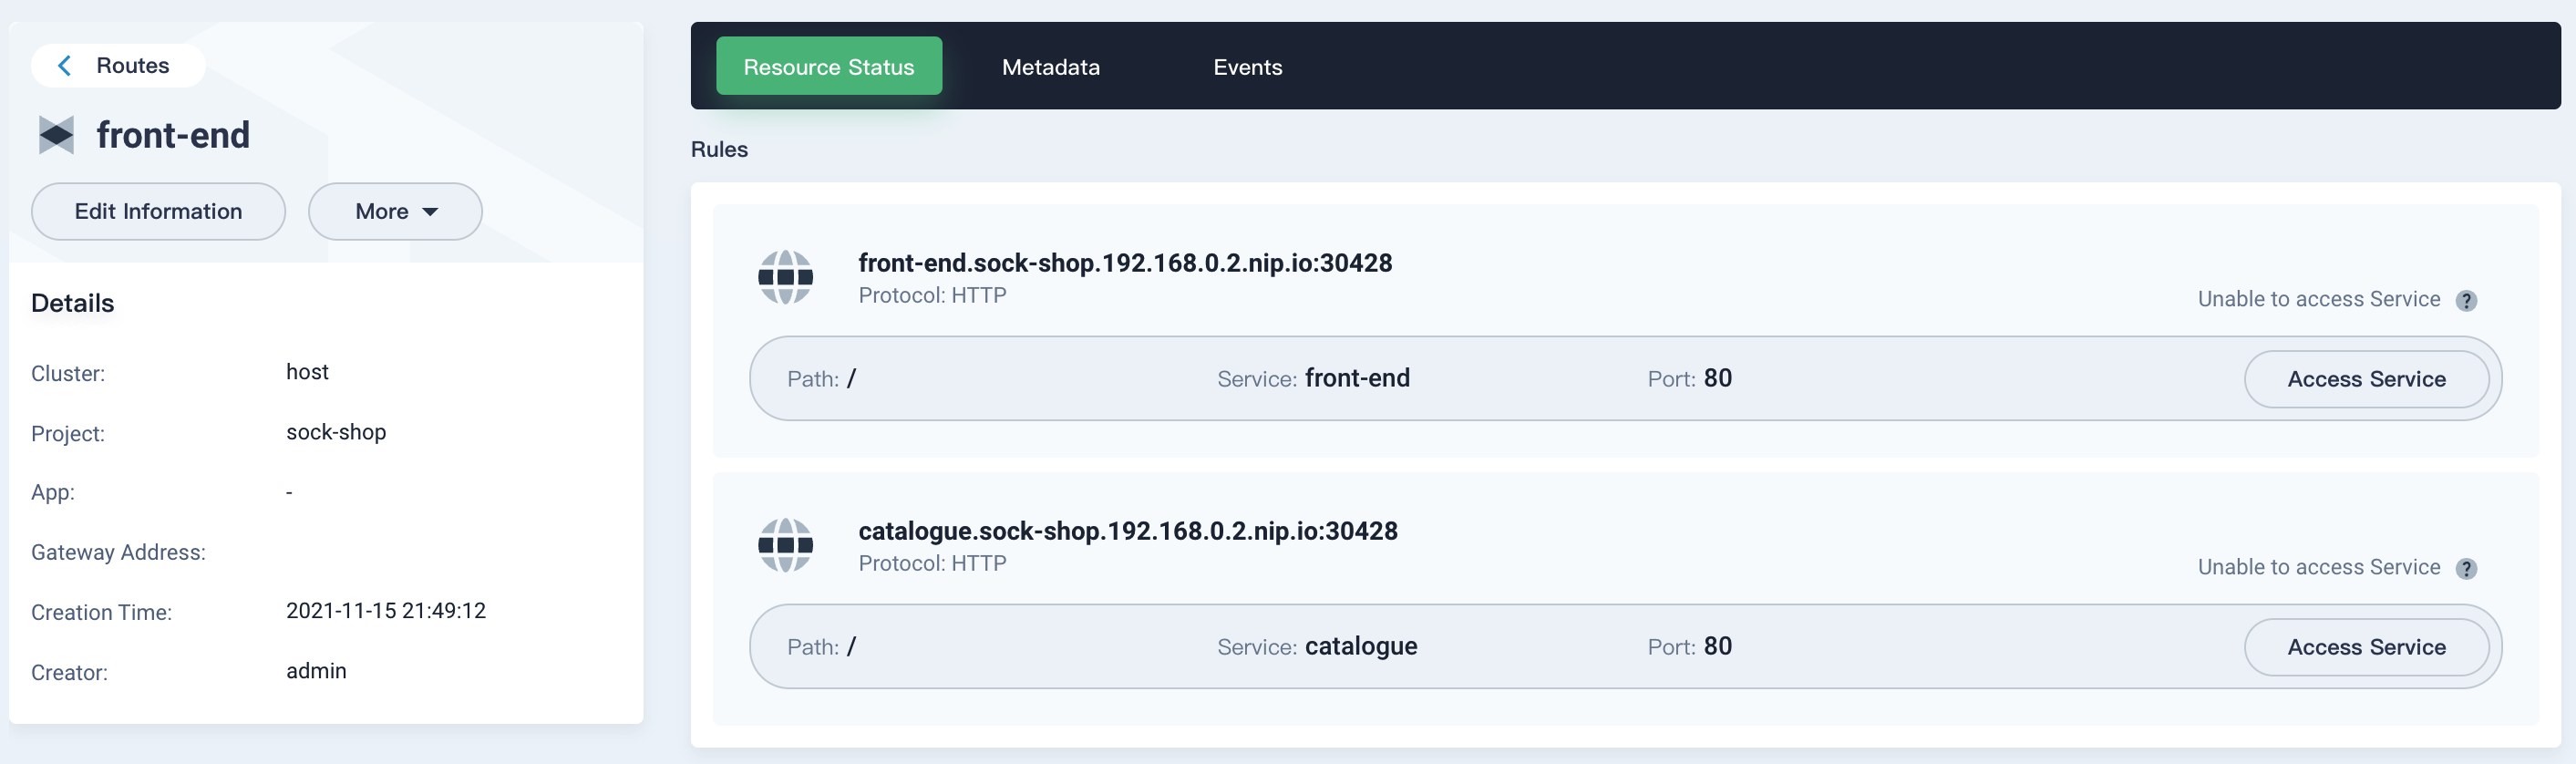
Refresh the SockShop web page (the page shows no changes) and check the network requests in the debugging console, as shown in the following figure.
X-Powered-By: Expressdoes not exist inResponse Headers, which means that the API request is directly sent to thecatalogueService according to the new routing rule without being forwarded by thefront-endService. In this example, two routing rules are configured in the Route. The/cataloguerouting rule is preferred to the/routing rule because the path of the former is longer and therefore more accurate.For more information about the Route settings, please refer to Routes.
Summary
This article briefly introduces the architecture of Routes, and compares Routes with Kubernetes Services and other application gateways. The SockShop example shows how to configure a project gateway and a Route. We would be delighted if this article can help you better understand Routes and choose the most appropriate method to expose applications based on their characteristics.
