


In my previous articles, I talked about how to use KubeKey to set up and scale a Kubernetes cluster. As you may already know, KubeKey can do way more than that. You can also use KubeKey to install KubeSphere, a container platform running on top of Kubernetes with streamlined DevOps workflows, unified multi-cluster management and more. Besides, KubeKey is able to install cloud-native add-ons by Chart or YAML files.
Among other things, storage represents one of, if not the most important element as you set up a Kubernetes cluster. Kubernetes itself supports multiple storage solutions, such as NFS-client, Ceph CSI and GlusterFS (in-tree). In this article, I am going to show you how to use KubeKey to create a Kubernetes and KubeSphere cluster with NFS-client Provisioner providing external storage.
What is NFS
Network File System (NFS) provides you with remote access to files and directories on a server machine. It allows multiple clients to access shared resources over a network.
You can install NFS-client Provisioner as a storage plugin for your Kubernetes cluster while you must configure an NFS server beforehand. Here is how it works: an NFS client mounts a directory on the server machine so that files residing on the NFS server are accessible to the NFS client. The directory, which you create on the server and share with your client, is also called an exported directory. To ensure that your client can access the directory smoothly, you must grant the access to them with several commands which I will show you later.
At the same time, a component called nfs-common (for Debian-based Linux distributions) or nfs-utils (for CentOS-based Linux distributions) needs to be installed on all the client machines to provide essential NFS client libraries and utilities.
How Does KubeKey Use NFS-client Configurations
As I said above, you can use KubeKey to install different add-ons by Chart or YAML files. The configuration of these add-ons must be offered in the configuration file (config-sample.yaml by default) created by KubeKey. To let KubeKey apply these configurations during installation, there are generally two ways:
- Input necessary parameters under the
addonsfield directly inconfig-sample.yaml. - Create a separate configuration file for your add-on to list all the necessary parameters and provide the path of the file in
config-sample.yamlso that KubeKey can reference it.
In this article, I will use the second way for demonstration. The general steps are:
- Set up an NFS server.
- Install
nfs-commonornfs-utilson all the client machines in your cluster and create a separate configuration file for NFS-client Provisioner on one of the client machines that servers as the taskbox for installation. - Download KubeKey on the taskbox.
- Use KubeKey to create your cluster configuration file (
config-sample.yaml) and edit it. - Install Kubernetes, KubeSphere and NFS-client Provisioner including the storage class.
Prepare Hosts
Here is my node information for your reference:
| Host IP | Hostname | Role | System |
|---|---|---|---|
| 192.168.0.2 | server | NFS server | Ubuntu 16.04, 4 Cores, 4 G Memory, 100 G Disk |
| 192.168.0.3 | client1 | master, etcd | Ubuntu 16.04, 8 Cores, 8 G Memory, 50 G Disk |
| 192.168.0.4 | client2 | worker | Ubuntu 16.04, 8 Cores, 8 G Memory, 50 G Disk |
| 192.168.0.5 | client3 | worker | Ubuntu 16.04, 8 Cores, 8 G Memory, 50 G Disk |
The server machine, where the NFS server will be installed, provides external storage services for three client machines in the cluster.
For more information about requirements for nodes, network, and dependencies, see one of my previous posts.
Install and Configure an NFS Server
Step 1: Install the NFS kernel server
To set up your server machine, you must install the NFS kernel server on it.
Run the following command so that you will be using the latest package on Ubuntu for installation.
sudo apt-get updateInstall the NFS kernel server.
sudo apt install nfs-kernel-server
Step 2: Create an exported directory
Your NFS client will mount a directory on the server machine which has been exported by the NFS server.
Run the following command as root to specify a mount folder name (for example,
/mnt/demo). This is also the directory that will be shared with your client machines.sudo mkdir -p /mnt/demoTo ensure that all the clients can access the directory, remove permissions of the folder.
sudo chown nobody:nogroup /mnt/demosudo chmod 777 /mnt/demo
Step 3: Grant your client machine access to the NFS server
Run the following command to edit the
/etc/exportsfile withnano.sudo nano /etc/exportsAdd your client information to the file. Note that if you have multiple directories that you want to share with your clients, you need to add them all to the file. Here is the syntax:
/mnt/demo clientIP(rw,sync,no_subtree_check)If you have multiple client machines, add each line for all of them. Alternatively, specify a subnet in the file so that all the clients within it can access the NFS server. For example:
/mnt/demo 192.168.0.0/24(rw,sync,no_subtree_check)Note
rw: Read and write operations. The client machine will have both read and write access to the volume.sync: Changes will be written to disk and memory.no_subtree_check: Prevent subtree checking. It disables the security verification required for a client to mount permitted subdirectories.
Save the file.
Step 4: Apply the configuration
Run the following command to export your shared directory.
sudo exportfs -aTo make your configuration effective, restart the NFS kernel server.
sudo systemctl restart nfs-kernel-server
Configure the Client Machine
Now that we have our server machine ready, we need to install nfs-common on all of our clients. It provides necessary NFS functions while you do not need to install any server components.
Likewise, execute the following command to make sure you are using the latest package.
sudo apt-get updateInstall
nfs-commonon all the clients.sudo apt-get install nfs-commonGo to one of the client machines (taskbox) where you want to download KubeKey later (for example,
client1). Create a configuration file that contains all the necessary parameters of your NFS server which will be referenced by KubeKey during installation.vi nfs-client.yamlHere is my configuration for your reference:
nfs:
  server: "192.168.0.2"    # This is the server IP address. Replace it with your own.
  path: "/mnt/demo"    # Replace the exported directory with your own.
storageClass:
  defaultClass: false
Note
- If you want to configure more values, see chart configurations for NFS-client.
- The
storageClass.defaultClassfield controls whether you want to set the storage class of NFS-client Provisioner as the default one. If you inputfalsefor it, KubeKey will install OpenEBS to provide local volumes, while they are not provisioned dynamically as you create workloads on your cluster. After you install KubeSphere, you can change the default storage class on the console directly.
Save the file. Now you can use KubeKey to install both Kubernetes and KubeSphere, together with NFS-client Provisioner.
Download KubeKey and Install a Cluster
Download KubeKey from its GitHub Release Page or use the following command to download KubeKey version 1.0.1. You only need to download KubeKey to one of your machines that serves as the taskbox for installation.
curl -sfL https://get-kk.kubesphere.io | VERSION=v2.0.0 sh -The above command downloads KubeKey and unzips the file. Your folder now contains a file called
kk. Make it executable.chmod +x kkSpecify a Kubernetes version and a KubeSphere version that you want to install. For more information about supported Kubernetes versions, see this list.
./kk create config --with-kubernetes v1.20.4 --with-kubesphere v3.2.1A default file
config-sample.yamlwill be created if you do not customize the name. Edit the file.vi config-sample.yaml... metadata: name: sample spec: hosts: - {name: client1, address: 192.168.0.3, internalAddress: 192.168.0.3, user: ubuntu, password: Testing123} - {name: client2, address: 192.168.0.4, internalAddress: 192.168.0.4, user: ubuntu, password: Testing123} - {name: client3, address: 192.168.0.5, internalAddress: 192.168.0.5, user: ubuntu, password: Testing123} roleGroups: etcd: - client1 master: - client1 worker: - client2 - client3 controlPlaneEndpoint: domain: lb.kubesphere.local address: "" port: "6443" kubernetes: version: v1.17.9 imageRepo: kubesphere clusterName: cluster.local network: plugin: calico kubePodsCIDR: 10.233.64.0/18 kubeServiceCIDR: 10.233.0.0/18 registry: registryMirrors: [] insecureRegistries: [] addons: - name: nfs-client namespace: kube-system sources: chart: name: nfs-client-provisioner repo: https://charts.kubesphere.io/main values: /home/ubuntu/nfs-client.yaml # Use the path of your own NFS-client configuration file. ...Pay special attention to the field of
addons. For more information about each parameter in this file, you can see one of my previous posts, or have a look at this example file and explanations for theaddonsfield. Note that you can also enable pluggable components of KubeSphere in this file, such as DevOps, service mesh, and App Store.Save the file and execute the following command to install Kubernetes and KubeSphere:
./kk create cluster -f config-sample.yamlWhen the installation finishes, you can inspect installation logs with the following command:
kubectl logs -n kubesphere-system $(kubectl get pod -n kubesphere-system -l app=ks-install -o jsonpath='{.items[0].metadata.name}') -fYou can see the following message if the installation is successful:
#####################################################
###              Welcome to KubeSphere!           ###
#####################################################

Console: http://192.168.0.3:30880
Account: admin
Password: P@88w0rd

NOTES:
  1. After you log into the console, please check the
     monitoring status of service components in
     "Cluster Management". If any service is not
     ready, please wait patiently until all components
     are up and running.
  2. Please change the default password after login.

#####################################################
https://kubesphere.io             20xx-xx-xx xx:xx:xx
#####################################################
Verify Installation
You can verify that NFS-client has been successfully installed either from the command line or from the KubeSphere web console.
Command line
Run the following command to check your storage class.
kubectl get scI did not set
nfs-clientas the default storage class so KubeKey installed OpenEBS for me as well. Expected output:NAME PROVISIONER RECLAIMPOLICY VOLUMEBINDINGMODE ALLOWVOLUMEEXPANSION AGE local (default) openebs.io/local Delete WaitForFirstConsumer false 16m nfs-client cluster.local/nfs-client-nfs-client-provisioner Delete Immediate true 16mRun the following command to check the statuses of Pods.
kubectl get pod -n kube-systemNote that
nfs-clientis installed in the namespacekube-system. Expected output (exclude irrelevant Pods):NAME READY STATUS RESTARTS AGE nfs-client-nfs-client-provisioner-6fc95f4f79-92lsh 1/1 Running 0 16m
KubeSphere console
The
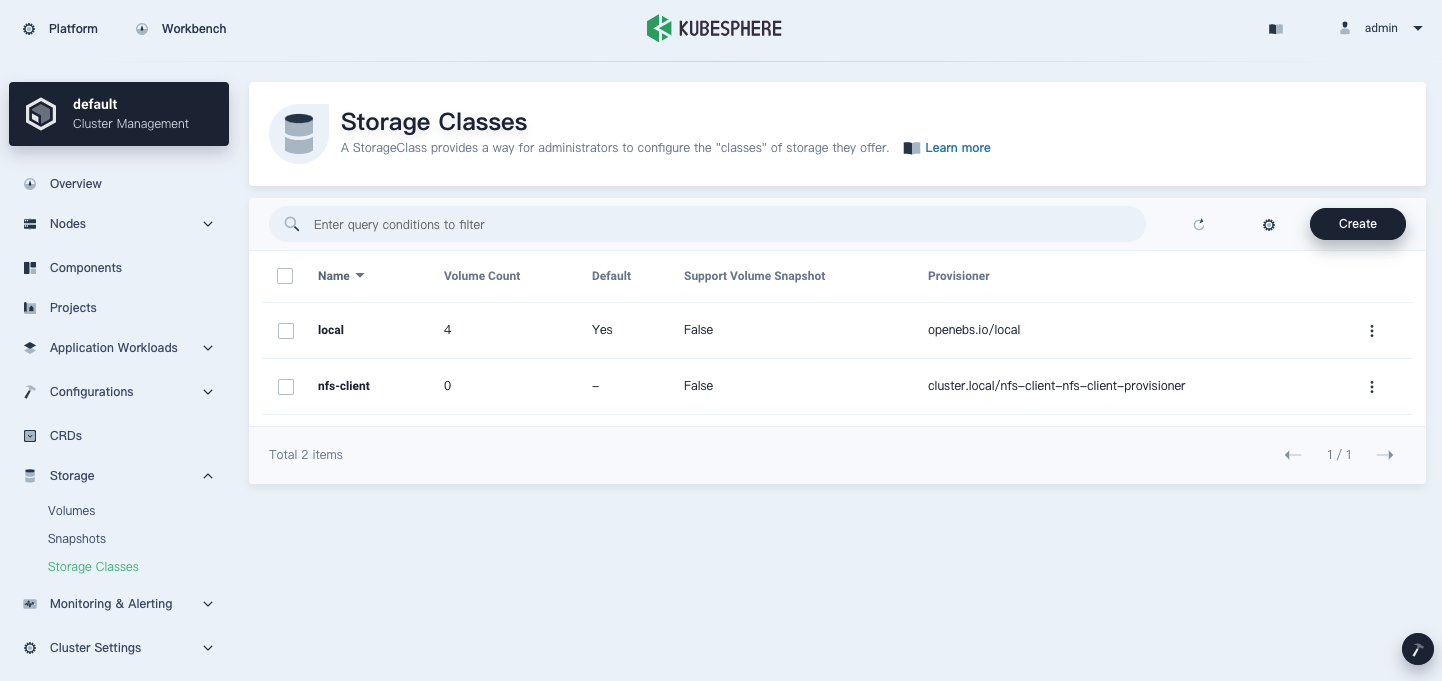
ks-consoleService is being exposed through a NodePort. Log in to the console at<node IP>:30880with the default account and password (admin/P@88w0rd). You may need to open the port in your security groups and configure relevant port forwarding rules depending on your environment.Click Platform in the top-left corner and go to Cluster Management. In Storage Classes under Storage, you can see two storage classes:
Go to Pods under Application Workloads, the Pod of
nfs-clientis also functioning well in thekube-systemnamespace.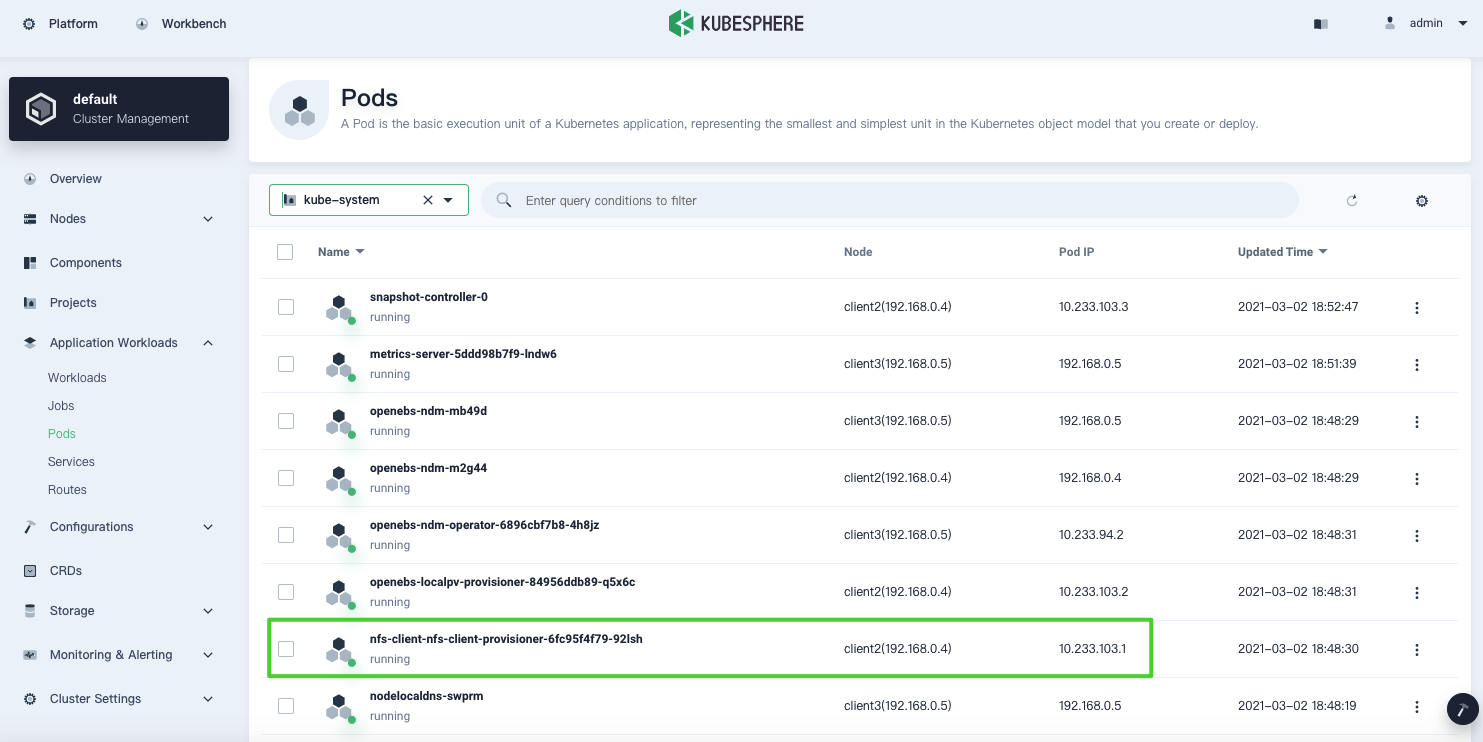
You can create a PVC in a project and verify the persistent volume bound to it can be mounted to a workload successfully.
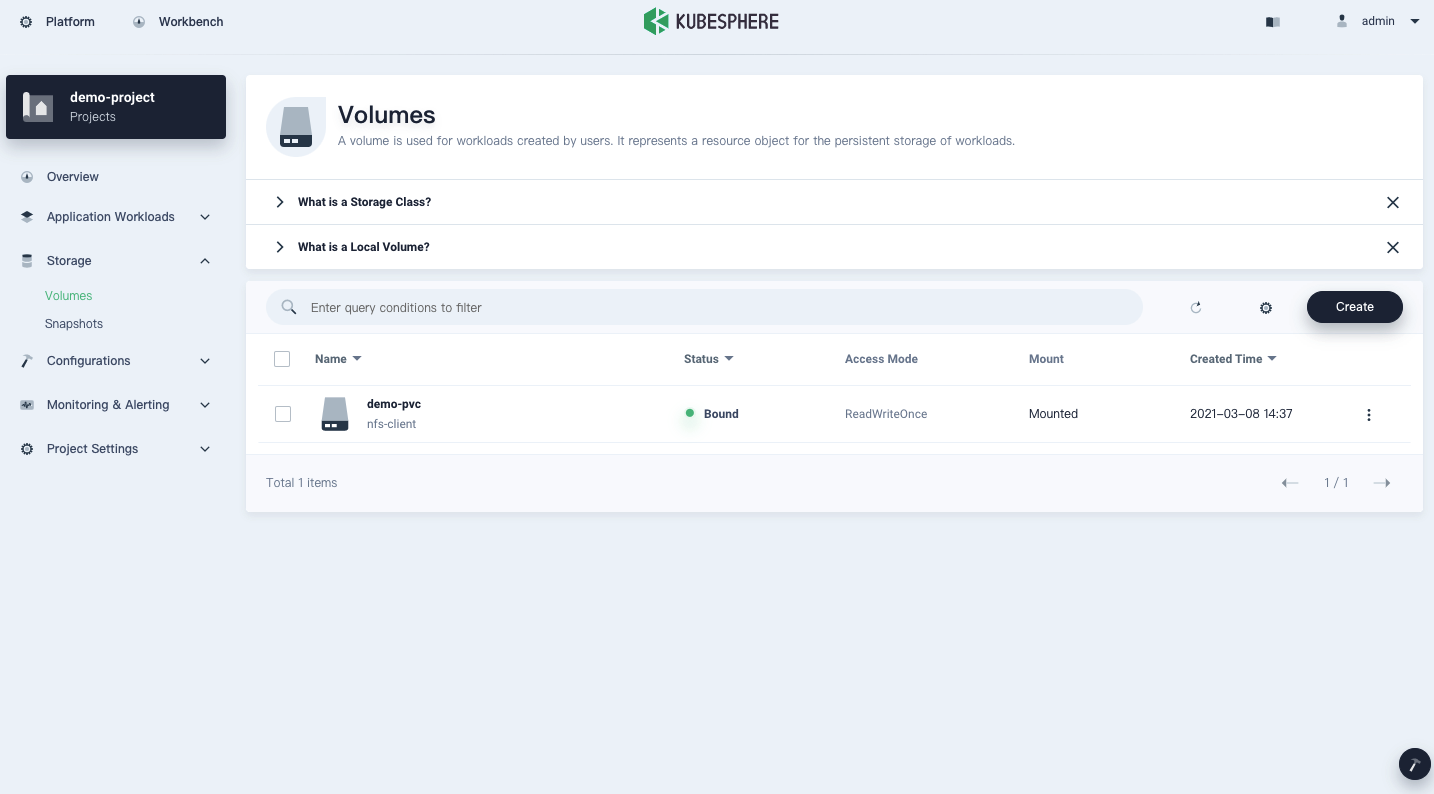
For more information about how to create a PVC on the KubeSphere console, see Volumes.
